50+ Pumpkin Carving Ideas: The 2025 Guide from Easy to Spine-Chilling
Find Your Perfect Pumpkin Vibe
Welcome, Halloween enthusiasts and pumpkin-picking newcomers alike! Whether this is your first time wrestling with a gourd or you’re a seasoned carving veteran, you’ve landed in the right spot. This guide is designed to be your one-stop shop for pumpkin inspiration, covering the entire spectrum from “I need something I can do in 10 minutes” to “I want to create a masterpiece that will terrify the entire neighborhood.”
So, grab your favorite marker (for sketching, not just for coloring—we see you, creatives!), and let’s dive into the wonderful world of pumpkin carving.
Here’s a quick map of our pumpkin patch to help you navigate:
Table of Contents
1. Gear Up: Your Pumpkin Carving Toolkit
Before the creative chaos begins, let’s get organized. You don’t need a professional sculpting kit, but a few key tools will make the process safer and more enjoyable.
The Essentials:
A Sharp, Serrated Knife: For cutting the top and making large cuts.
A Sturdy S coop or Ice Cream Scoop: For the satisfying, if messy, job of gutting the pumpkin.
A Poking Tool: A pushpin, nail, or specialized poking tool to transfer your design.
A Fine-Tip Marker: For drawing your design directly onto the pumpkin.
The “Pro-Enthusiast” Upgrades:
Clay Loop Tools: Incredible for shaving away the pumpkin skin to create shaded effects without cutting all the way through.
A Small Power Drill: Perfect for creating polka dots, starry skies, or textured patterns in seconds.
Specialized Carving Saws: Small, serrated blades that are much safer and better for detailed work than a kitchen knife.
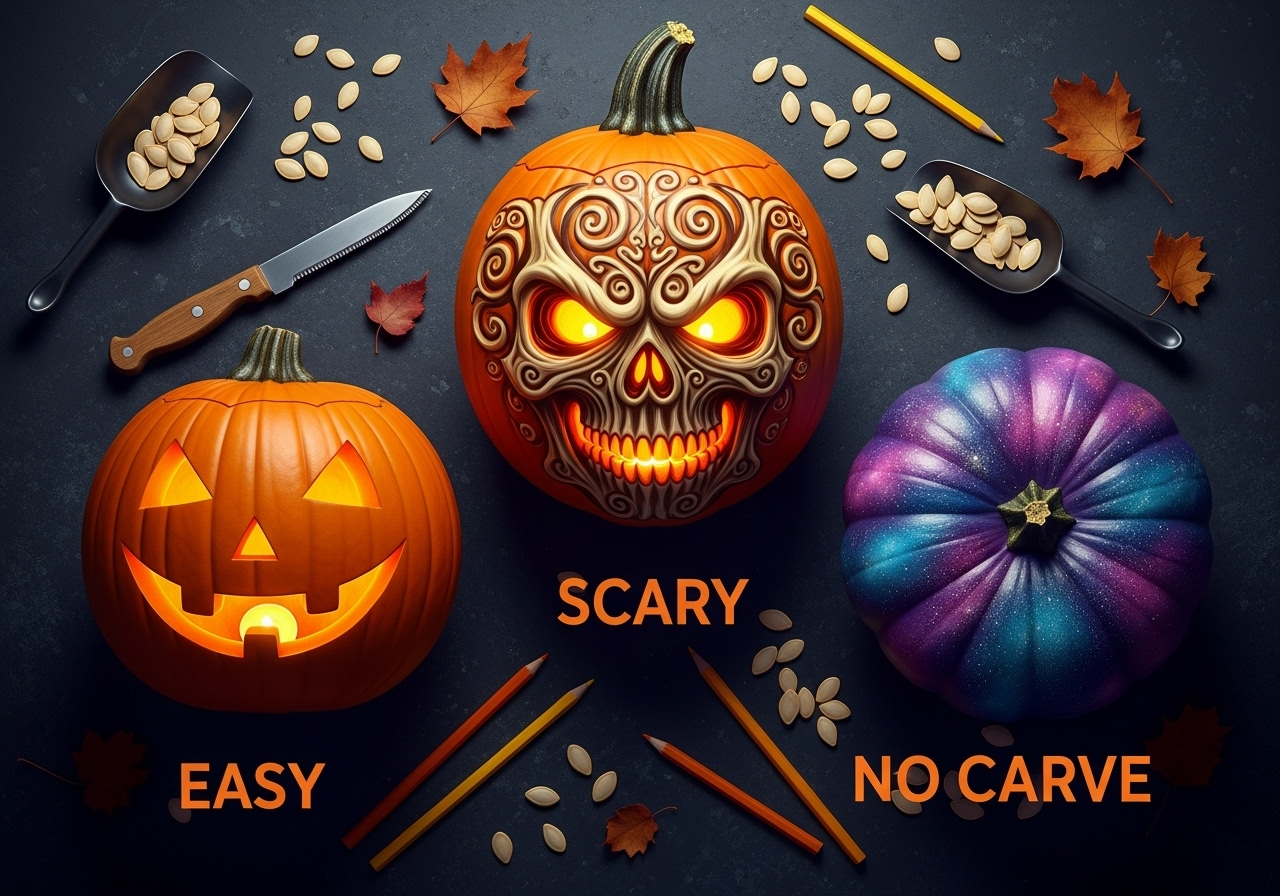
2. Easy Pumpkin Carving Ideas (For Beginners & Kids)
This section is for everyone searching for easy pumpkin carving ideas or basic jack o lantern ideas. The goal here is simple, recognizable, and fun designs with minimal frustration.
The Classic Jack: You can’t go wrong. Two triangle eyes, a triangle nose, and a toothy grin. It’s timeless for a reason.
Tip: Make the teeth different sizes for a goofier, friendlier look.
The Silly Winky Face: One eye open, one eye closed with a lopsided smile. It’s full of personality and only requires a few simple cuts.
The Simple Bat Silhouette: Carve two large, pointed wings and a small bat body. It’s an easy shape that looks incredibly effective when lit up.
The “Boo!” Ghost: A few wavy lines at the bottom for the ghostly tail and two simple oval eyes. Friendly and fast.
The Starry Night Pumpkin: No carving needed! Use a drill or a nail to poke star and crescent moon shapes. The light twinkling through the holes is magical.

The following is the full list of curated ideas are perfect for anyone searching for easy pumpkin carving ideas or basic jack o lantern ideas.
Simple Face & Character Ideas:
-
The Classic Jack: Two triangle eyes, a triangle nose, and a toothy grin.
-
The Silly Winky Face: One eye open, one eye closed with a lopsided smile.
-
The Goofy Grin: A wide mouth with a few missing teeth for character.
-
The Surprised Pumpkin: Two wide, round eyes and a perfect ‘O’ for a mouth.
-
The “Boo!” Ghost: A few wavy lines at the bottom and two simple oval eyes.
-
The Friendly Bat: A simple, symmetrical bat silhouette with pointed wings.
-
The Sitting Cat: A simple profile of a cat with its tail curled.
-
The Howling Wolf: An easy side-profile of a wolf head tilted back.
Simple Shape & Pattern Ideas:
9. Hearts: Carve a few simple hearts of different sizes.
10. Stars & Moons: A combination of star and crescent moon shapes.
11. Polka Dots: Use a drill or apple corer to make perfect circles.
12. Simple Spiderweb: A basic web with 8 spokes and a few circular connections.
13. The Word “Boo”: Use a stencil or free-hand this simple, classic word.
14. Jack-o’-Lantern Trio: Carve three small pumpkins with a circle, triangle, and square for a modern look.
“Carving” with a Drill (Easy & Effective):
15. The Starry Night Pumpkin: Use different drill bit sizes to create a random starfield.
16. The Sparkling Monogram: Drill out the initial of your last name.
17. The Magic Fairy Lantern: Drill small, dense holes in beautiful swirling patterns.
18. The Polka-Dot Parade: Create neat rows of drilled holes.
3. Scary & Advanced Pumpkin Designs (For a Terrifying Display)
Ready to level up? These scary pumpkin carving ideas are for those who want a terrifying display. of their porch to be the talk of the town—for all the right, spine-chilling reasons. These pumpkin design ideas require more patience and a steady hand.
 The Screaming Banshee: This design focuses on a wide, agonized mouth with sharp, jagged teeth and hollow, terrified eyes. It’s all about the expression.
The Zombie Rising: Carve a section of the pumpkin as if it’s bursting open, with a zombie hand or face emerging from the inside. Use loop tools to create shading on the “broken” pumpkin edges.
The Intricate Spider Web: Start with a central point and carve a detailed web radiating outwards, with a fuzzy spider perched on the side. The precision of the web is what makes this so impressive.
The Swirling Demon Face: Forget simple triangles. This face has swirling, slit-pupil eyes, a snarling nose, and a menacing grin that seems to move in the flickering candlelight.
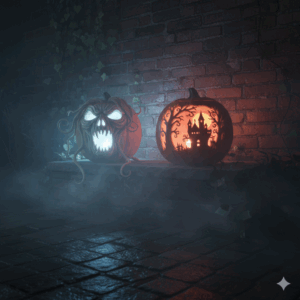
The Haunted Forest Silhouette: Carve a detailed scene of bare, twisting trees and a full moon on one side of the pumpkin. This tells a story and creates a stunning visual when lit.
Underlisted are all the different pumpkin design ideas you can try out this Halloween.
Terrifying Faces & Figures:
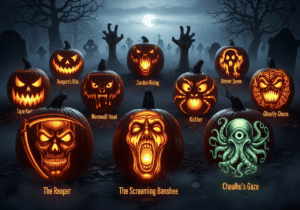
19. The Screaming Banshee: A wide, agonized mouth with sharp, jagged teeth and hollow eyes.
20. The Swirling Demon: Slit-pupil eyes that spiral, and a snarling, twisted mouth.
21. The Reaper’s Visage: The classic hooded skull of the Grim Reaper.
22. The Cackling Witch: A long-nosed profile with a warty chin and a pointy hat.
23. The Zombie Rising: Carve a section as if it’s bursting open, with a zombie hand emerging.
24. The Vampire’s Snarl: Featuring fangs and a menacing, angular face.
25. The Cthulhu Creature: A pumpkin tentacled with intricate, curling limbs.
Intricate Scenes & Silhouettes:
26. The Haunted Forest: A detailed scene of bare, twisting trees against a full moon.
27. The Creeping Cemetery: Silhouettes of tombstones, bare trees, and a rising ghost.
28. The Spider’s Lair: An intricate web covering one side, with a large, detailed spider.
29. The Rat King: A swarm of silhouetted rats crawling all over the pumpkin.
30. The Haunted Mansion: A detailed, Victorian-style house with broken windows.
Shading & Multi-Layer Techniques (Using Loop Tools):
31. The Ghostly Apparition: Shade the background, leaving a white ghost figure raised.
32. The Peeking Skeleton: Shade areas to create the illusion of ribs and a skull beneath the skin.
33. The Luminous Portrait: Create a portrait of a famous horror villain like Michael Myers, using shading for depth.
34. The Celtic Skull: An intricate, patterned skull design using both cut-out and shaded techniques.
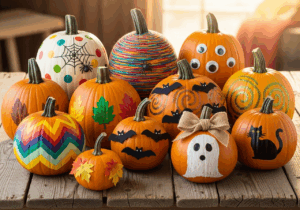
4. No-Carve Pumpkin Ideas (Quick, Clean, & Stunning)
Not a fan of the slimy guts? Short on time? These easy Halloween pumpkin ideas are creative, beautiful, and completely knife-free. They’re also perfect for young children.
 The Glitter-Dipped Pumpkin: Paint the bottom half of a white or orange pumpkin with glue and dip it in black or orange glitter. Elegant and sparkly.
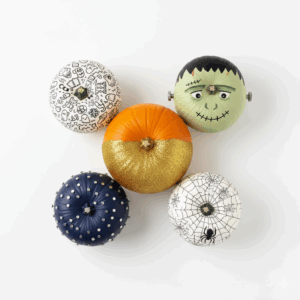
The Painted Monster Squad: Use acrylic paint to create a family of friendly (or scary) monsters. Think Frankenstein with bolt eyebrows, a mummy with gauze strips, or a furry werewolf.
The Decoupage Pumpkin: Mod Podge and Halloween-themed paper napkins are your best friends. Tear the napkins and layer them for a cool, collage effect.
The Thumbtack Galaxy: Use silver, gold, and black thumbtacks to create constellations or a swirling galaxy on a dark-colored pumpkin.
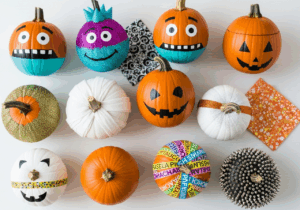
The Marker Doodle Pumpkin: Give everyone a black permanent marker and let them go to town with patterns, faces, and Halloween doodles. It’s the ultimate stress-free, creative outlet.
Here are all our curated easy Halloween pumpkin ideas you can try out beautifully, and completely knife-free.
Pumpkin Painting Ideas:
35. The Mummy Wrap: Use white gauze strips and glue, with painted black eyes peeking through.
36. The Frankenstein Monster: Green paint, black bolt eyebrows, and stitched scars.
37. The Black Cat: Paint the entire pumpkin black and add glowing green eyes and a arched back.
38. The Galaxy Pumpkin: A black base with swirls of purple, blue, and dabbed-on white stars.
39. The Splatter Paint Pumpkin: Flick white and red paint over a black pumpkin for a messy, modern look.
40. The Ombre Pumpkin: Blend from dark orange at the bottom to light yellow at the top.
Glitter, Glue & Embellishments:
41. The Glitter-Dipped Pumpkin: Paint the bottom half with glue and dip it in black or purple glitter.
42. The Sequined Pumpkin: Glue on sequins in a beautiful pattern, like a chevron or stripes.
43. The Thumbtack Galaxy: Use silver, gold, and blue thumbtacks to create a constellation map.
44. The Studded Pumpkin: Use gold or silver studs from a craft store to make patterns.
Decoupage & Stickers:
45. The Napkin Decoupage: Use Mod Podge to apply patterns from Halloween-themed paper napkins.
46. The Book Page Pumpkin: Decoupage with pages from a horror novel, then add a black lace ribbon.
47. The Vintage Sticker Collage: Use a collection of vintage-style Halloween stickers.
Other Creative Methods:
48. The Marker Doodle Pumpkin: Cover a white pumpkin with intricate, continuous-line black marker doodles.
49. The Washi Tape Pumpkin: Use patterned washi tape to create geometric designs or stripes.
50. The Melted Crayon Pumpkin: Glue crayons to the top and use a hairdryer to melt them down the sides.
5. Pro Tips & Preservation Tricks
You’ve created your masterpiece; now make it last! These simple hacks will keep your pumpkin looking its best.
Cut from the Bottom: Instead of cutting around the stem, cut a hole in the bottom. This makes it easier to place over a light source and prevents the top from sagging.
The Bleach Bath: After gutting, wipe the inside with a solution of 1 tablespoon bleach to 1 gallon of water. This kills mold and bacteria.
Vaseline is Your Friend: Rub petroleum jelly on all the cut edges. This seals in moisture and dramatically slows down the shriveling process.
Hydrate, Hydrate, Hydrate: If your pumpkin does start to wilt, give it an ice water bath for a few hours to rehydrate it.
Your Pumpkin, Your Masterpiece
However you choose to decorate your pumpkin—whether with a simple knife, a handful of glitter, or a set of detailed tools—the goal is the same: to have fun and add a little more spooky, silly, or spectacular creativity to your Halloween.
The best Jack-o’-lantern is the one that brings you joy. Now go light it up and watch it glow!